Three quick ways to shift left and fix accessibility issues sooner
Digital accessibility is essential to the software design lifecycle (SDLC). You can’t build products that meet compliance requirements without it, and if your product fails to meet accessibility standards, you face stalled sales, loss of market share, legal and financial risk, and more.
Unfortunately, however, digital accessibility is often an afterthought—if it’s thought of at all. And that’s a problem. Being reactive about digital accessibility (discovering issues only after they’ve already made it into the product) increases cost, slows down your teams, frustrates your users, and can create barriers for people with disabilities.
The good news? It doesn’t have to be this way.
By shifting digital accessibility checks earlier in your development workflow—while you’re building, not after the fact—you catch issues when they’re easiest and cheapest to fix. That’s what it means to “shift left”: moving your testing and quality practices earlier in the SDLC, so you can fix problems before they spread.
With the right tools, digital accessibility is not only easy, but it can be faster than what you’re doing now.
In this article, I’ll show you three quick ways to shift accessibility left without changing your processes or adding overhead, by using tools that plug directly into the environments your developers already use every day:
- axe DevTools Linter runs in your IDE (integrated development environment) or CLI (command-line interface) to flag issues as you write code, before it’s ever committed.
- axe DevTools Extension scans your UI in the browser and gives you real-time feedback on what needs fixing.
- axe Developer Hub adds accessibility checks to your end-to-end tests and Continuous Integration (CI) pipeline, so you can catch regressions before they ship.
With these tools, you can move from reactive to proactive, catching and fixing issues earlier, reducing rework, and delivering accessible experiences from day one.
Quick-way #1: Catch issues while you code
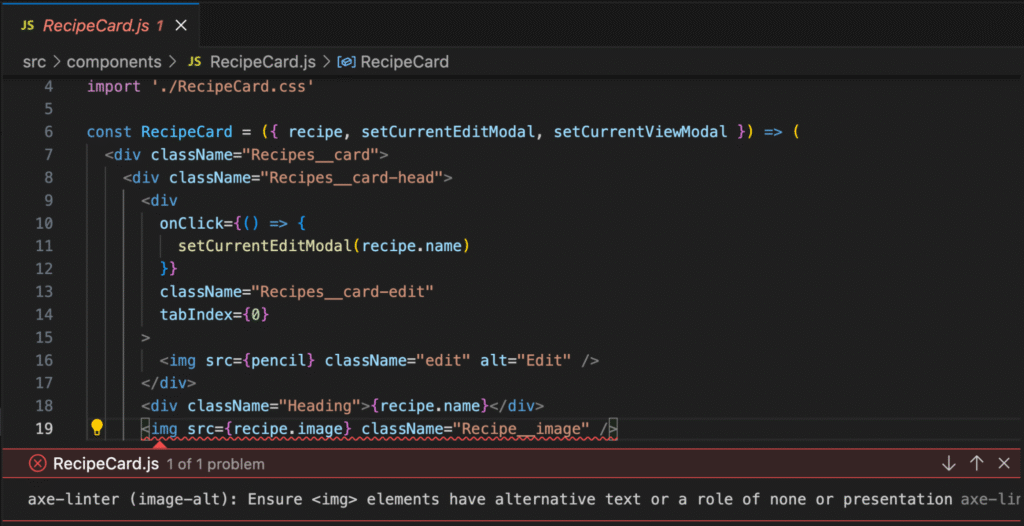
While you’re coding, you’re already likely using linting software to keep your code clean, consistent, and standards-compliant. Accessibility should be part of that standard.
The axe DevTools Linter brings accessibility into the same workflow. It will flag issues as you code, right in your IDE. This makes it easier to catch and fix common issues such as:
- missing or incorrect alt text
- improper heading structure
- invalid ARIA usage
- components without accessible names
- and more
If you use a design system, you can configure the linter to recognize your custom components and apply accessibility rules automatically.
By treating accessibility the same way you treat code style and syntax, you reduce the back-and-forth of QA bugs, prevent issues from going live, and build better from the start.
If you need more support, there are links to Deque University, where you can find trusted resources to help you resolve these issues. You can learn more about the issue, how to remediate it, and even which disabilities are typically affected if the issue persists.
You can even extend the axe DevTools Linter to map to your team’s preferred component library or custom components.
If you want to take things even further, you can integrate the axe DevTools Linter into your team’s development workflow. For example, you can:
- Scan pull requests using GitHub Actions.
- Use pre-commit hooks to catch issues even earlier.
- Apply team-wide accessibility linting standards.
The axe DevTools Linter also provides a CLI, making it easy to automate accessibility checks across your CI/CD pipeline. You can use it for scripting and to run accessibility scans as part of your build process to ensure you are committing axe-clean code / not adding new accessibility issues. And if you prefer to keep all of your code local, you can enable the –local flag to lint files entirely within your environment without sending source code to a server.
For larger teams or more advanced workflows, the axe DevTools Linter can integrate into any CI tool like GitHub Actions, Azure DevOps, or Jenkins and show results in code quality tools like SonarQube so you can track accessibility issues across your repositories over time. You can also extend support to libraries like MUI, React Native, or Cauldron (our accessible component library) and enforce rules across your design system.
Explore more in the axe DevTools Linter docs
These advanced workflows make it easier to scale accessibility across your team by integrating directly into the tools developers already use every day. Accessibility then becomes just another part of delivering high-quality software—on par with security, performance, and privacy. It’s not about overhauling how you work; it’s about making accessibility a seamless part of the processes you already follow.
Quick Way #2: Test in the browser with the axe DevTools Extension
Analyzing code in the IDE is great for catching those code-level issues early, but once your component is rendered in the browser, you need to make sure it behaves the way that users expect, which is where browser-based testing comes in.
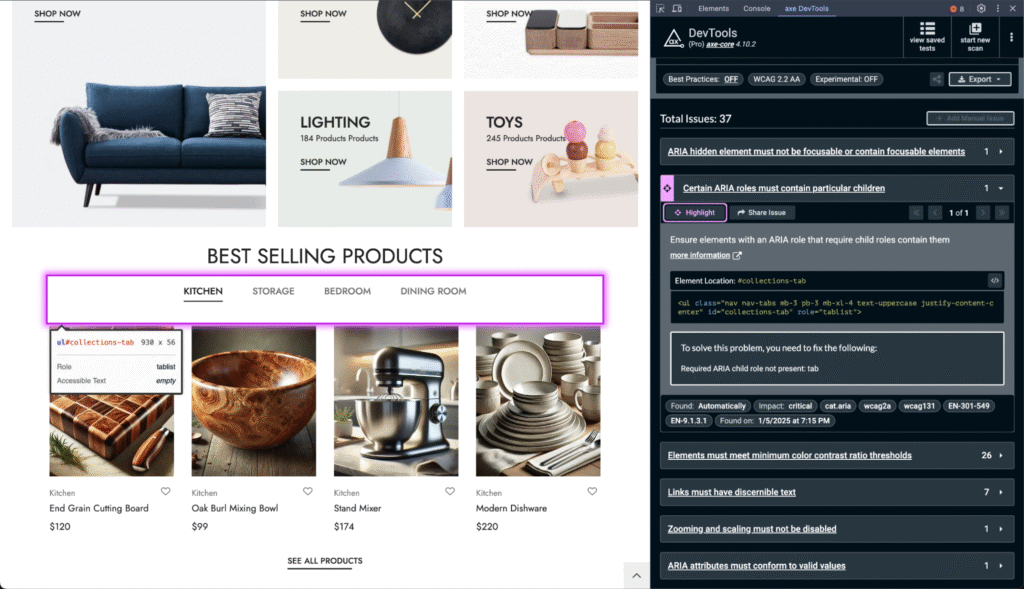
Many developers keep a browser open while coding, whether viewing a local build or working in a staging environment. The axe DevTools Extension runs right inside your web browser and gives you a fast, developer-friendly way to find and fix accessibility issues in the rendered experience. Whether you’re testing a full page, a modal, or just a single component, you can scan with one click and immediately see what needs attention.
Each issue is highlighted directly on the page and mapped to the corresponding DOM element. You’ll get severity levels, selectors, and the relevant code snippet, so you can quickly locate the problem and fix it while it’s still fresh. And, the fix is never left up to guesswork. Each issue includes clear, contextual remediation steps and direct links to further documentation. Whether you’re validating a fix or learning as you go, the guidance is built in.
Tip: Run partial scans on the specific UI section you’re working on. This keeps feedback focused and actionable, without overwhelming you with unrelated results.
The axe DevTools Extension is free to install from the Chrome Web Store, Firefox Add-ons, or the Edge Add-ons site. Once set up, it becomes an essential part of your workflow, helping you test earlier, build smarter, and catch more issues before they go live.
If you want to take things a step further, the paid features include Intelligent Guided Tests (IGTs). IGTs are quick, structured walkthroughs that help you verify accessibility for things that automated tools alone can’t check, like keyboard behavior or accessible names.
IGTs are especially helpful when you’re building forms, modals, or other interactive elements, and you want to feel confident before opening a pull request or sharing your work. Because they’re fast and repeatable, IGTs make it easy to go beyond automated scanning without slowing down your process.
The axe DevTools Extension is powered by axe-core, the industry-standard, open-source accessibility engine. With billions of end-user downloads, axe-core is trusted by major frameworks and tools across the web, and it is critical to the development processes of companies such as Google and Microsoft.
If you’re using the paid features, you can also export results, generate shareable reports, and track issues directly in Jira, helping your team stay aligned and accountable across the development cycle.
Quick Way #3: Integrate accessibility into end-to-end tests with axe Developer Hub
If you’re already writing end-to-end (E2E) tests with tools like Cypress, Playwright, or WebDriverIO, you’re in a great spot to add accessibility coverage without reinventing your test suite. Axe Developer Hub plugs directly into your existing tests and CI workflows, allowing you to run accessibility checks in the background. There’s no need to rewrite anything or layer on complex logic, just add a few simple lines of code into your test’s configuration file.
As your tests simulate real user flows (such as opening a modal, submitting a form, or navigating between pages), axe Developer Hub automatically scans those states for accessibility issues. It works across the full app experience—including dynamic content and transitions—so you’re catching problems in the same places users encounter them.
You can:
- Run scans during E2E tests, without modifying individual test files.
- Surface issues in real UI states, not only static pages.
- Avoid duplicate noise, thanks to smart deduplication across test runs.
- Enforce accessibility in CI, using GitHub Actions, Jenkins, or your existing pipeline.
- Track regressions, with comparisons between each commit’s scan results.
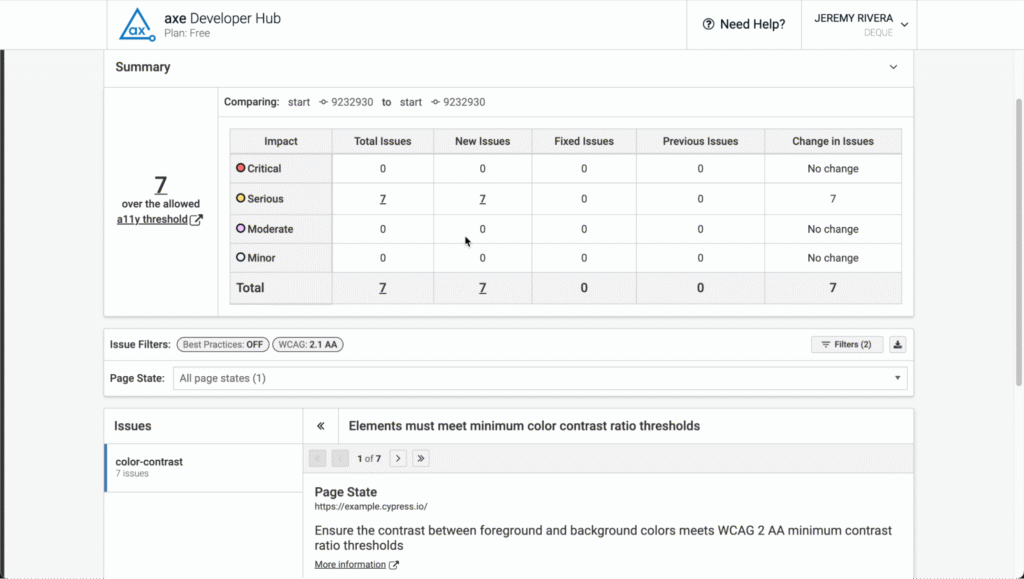
You’ll get clean, focused reports that highlight what changed, where it changed, and how to fix it. And with pull request annotations and GitHub comments, accessibility results are visible to your whole team—right where code reviews happen.
Try it out, and you’ll get everything you need to start scanning your app during E2E test runs.
The payoff: A more efficient, inclusive workflow
Shifting accessibility left results in faster overall development cycles and more inclusive products, without introducing unnecessary friction.
Here’s how the pieces fit together:
- axe DevTools Linter
Runs in your IDE to flag accessibility issues as you code, before anything gets committed. You can catch missing alt text, improper headings, and more, right at the source. - axe DevTools Extension
Tests your rendered UI in the browser. Whether you’re debugging a modal or scanning a full page, you get immediate visual feedback mapped to the code that needs attention. - axe Developer Hub
Adds accessibility coverage to your end-to-end tests and CI pipeline. It catches regressions, deduplicates issues across flows, and surfaces results directly in pull requests, without adding maintenance overhead to your test suite.
Each of these tools integrates well within the environments and workflows you already use. Together, these tools encompass the entire development cycle, from writing and rendering code to validating and deploying it across environments.
Get started today
You don’t have to wait for a big rollout or budget cycle. These tools are free to start using right now, and they fit into the environments you already use:
- Install the axe DevTools Linter in your IDE to catch issues as you write.
- Add the axe DevTools Extension to your browser and try out our Intelligent Guided Tests.
- Trial axe Developer Hub to extend accessibility coverage across your E2E test suite and CI pipeline.
No matter where you’re starting from, shifting left is always possible. The sooner you begin, the easier it is to be proactive.